Do you want to create your website on your own? Starting a new website as a beginner is not an easy task. Especially when you have no idea what to do and where to start. But don’t worry, we can help.
We have helped thousands of people in creating their WordPress website. So here is the complete step by step guide that you can follow to create your website.
Before we start the process, let’s clear some common concerns and queries. Most people think that only a web developer can create a website. Assuming, we need expert knowledge of coding.
But it’s not true. In this guide, you can learn how a non-techy user can create a fully functional website without touching the code.
What Do I Need To Build A Website?
When you start your website a question arises, what are the requirements? These are the three essential things to start your WordPress site.
- A domain name – to represent your website, such as wordpreesexpert.com
- WordPress hosting – a capacity to store your website files.
- Uninterrupted attention.
How Much Does A WordPress Website Cost?
It solely depends on what type of website you want to create. A simple personal website can be as affordable as 100$. But on the other hand, a business website can cost up to thousands of dollars.
We suggest you start with small sites, as a beginner. Afterwards once your business starts growing and you have a strong grasp on the basics. You can add new required features to your website. So you can save money and avoid loss in case of any issue.
Which Is The Best Website Builder Platform?
There are a lot of website builders available in the market. They all can help you to set up a website. But our experts suggest using self-hosted WordPress.
WordPress is a well known website builder. 43% of sites on the internet are build through WordPress. It’s free to use with thousands of exciting features and plugins, flexible to adjust with any third party tool.
How to Get the Most Out of This Website Design Tutorial?
Here’s our step-by-step guide on building a website! We’ve broken down the process into clear, manageable steps. Guiding you through each phase from start to end. By following these instructions, you’ll be able to create a professional website customized to your needs.
Along the way, we’ll also offer tips and resources, depending on your specific goals and preferences.
Do you need assistance? Our team is here to help! Just reach out, and we’ll set up your website for you. Let’s dive in and get started!
Step 1. Website Setup
Most beginners make a common mistake by choosing the wrong website platform. You can avoid these mistakes by following our instructions!
For most people, a self-hosted WordPress.org site is an ideal choice. WordPress offers thousands of theme options and add-ons. It allows you to create virtually any type of website from your imagination. For more details, check out our guide on why WordPress is a top choice for website building.
WordPress is free to download and use, with no restrictions on the types of websites you can create.
Understanding the Costs of a WordPress Website
While WordPress itself is free to use, some essential components do come with costs, such as a custom domain name and web hosting. For more details, check out our article on why WordPress is free.
A domain name is a text representing your site’s address on the internet. What people type into their search bar to find your site. You’ll also need website hosting to store your site’s files, providing a “home” for your website on the internet.
Hostinger is one of the world’s largest hosting providers and an officially recommended hosting partner by WordPress.

Buy your domain name and hosting now.
Step 2: Install WordPress
When you sign up with Hostinger using our referral link, WordPress will be automatically installed for you! Hostinger offers a one-click WordPress installer to make website creation even more simple, especially beginners.
To get started, log in to your Hostinger account and go to the ‘Websites’ tab in the left menu. From there, click ‘Add Site’.
Then follow these steps:
- Select the button ‘Install WordPress’ and ‘Continue’.
- Enter a title for your website. Don’t worry, this can be changed later. After you’ve entered a name, select ‘Continue’.
- Hostinger will now complete the WordPress installation, creating a new website for you. Once it’s done, you’ll see your website listed under the ‘Websites’ tab.

To access your new site, simply click ‘Edit Site’ to enter your WordPress dashboard. You can also go to yoursite.com/wp-admin/ to login directly in your browser. With your hostinger account, you can create multiple websites. Just go to the My Sites section and use the WordPress installer to add more sites as needed.

Once you have set up WordPress, it’s time to customize your website. By choosing a design template and creating new pages. Let’s move on to the next step!
Step 3: Choose Your Theme
A WordPress theme controls the look and feel of your website, allowing you to create a visually appealing site with ease.
WordPress themes are professional templates that you can install to change the appearance of your site. By default, WordPress comes with a basic theme, which may look quite simple.
Luckily, there are thousands of free and premium themes available that can instantly enhance your site’s design.
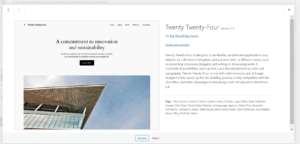
To change your theme, go to your WordPress dashboard and navigate to Appearance » Themes. Then click the ‘Add New’ button.

In the Add Themes screen, you’ll find over 11,000 free themes in the official WordPress theme directory. You can browse by popular, latest, featured and filter by features like industry, layout and more.
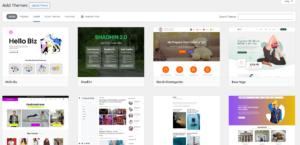
If you need inspiration, check out our list of top free WordPress business themes or our curated selection of the best premium themes for WordPress.
For this guide, we’ll use the Astra theme. It’s a popular, versatile free theme that works well for many types of websites.
If you prefer a fully custom design, we recommend using the Elementor page builder to create a unique WordPress theme without writing any code.
How to Install a Theme in WordPress
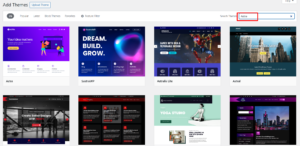
If you already know the name of the free theme you want to use, simply enter it in the search bar on the Themes page. WordPress will display it in the results, and you can hover over the theme and click the ‘Install’ button to add it to your site.
Once you have installed WordPress, you can customize. Just navigate to Appearance » Customize in your admin dashboard. This opens the Theme Customizer, where you can adjust settings and see a live preview of your changes.

For newer full-site editing themes, customization options can be accessed via the Editor link under Appearance.
Keep in mind that standard Theme Customizer or Full Site Editor can never provide a full drag-and-drop experience. For greater customization, many site owners prefer using a WordPress page builder like Elementor.
It allows you to adjust fonts, styles, colours and more to suit your site’s needs. You can even create a fully custom WordPress theme without touching a single word from coding!

Remember, you don’t have to finalize all theme settings right away. Customizing your theme often becomes easier once your site has some content.
Do you need help with your WordPress theme? Let our experts help you! Our experienced WordPress designers can design a custom WordPress website for you in an affordable range. Now, let’s move on to adding content to your WordPress site.
Step 4: Add Content to Your Website
There are two main content types, posts and pages. Posts are typically used for blog entries and display in reverse chronological order. Pages, on the other hand, are designed for static, one-time content like your “About” page, “Contact” page, privacy policy or custom landing pages.
By default, WordPress displays a feed of blog posts on the homepage. However, you can set any static page as your homepage instead. You also have the option to create a separate page for your blog posts or to create a website with no blog section at all.
Let’s start by adding some content to your site.
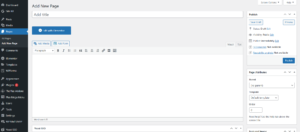
To add pages, go to Pages » Add New in your WordPress dashboard. This opens the page editor, where you can:
- Enter a title for your page.
- Add content to the editor such as text, links, images, videos8 and audio.
Once your page is ready, click Publish to make it live on your site. Repeat this process for additional pages, like “About Us,” “Contact,” and a blog page to showcase your posts.
Next, let’s add a few blog posts.
Head to Posts » Add New in your dashboard. You’ll see a similar editor screen as when creating pages. Here, you can:
- Add the main title and create content for your post.
- Use the sidebar options to set categories, tags, and post formats.

You can either save your post as a draft or click Publish to make it visible on your site.
Step 5: Customizing and Fine-Tuning Your Website
Now your website has some content, it’s time to customize and organize it to create a polished, user-friendly experience.
Set Up a Static Homepage
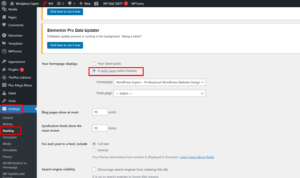
To display a static front page, go to Settings » Reading in your WordPress dashboard. Below the option ‘Your homepage displays’, select the ‘A static page’. Then choose your Home and Blog, pages you have already created.
Apply these settings by clicking ‘Save Changes’ to. WordPress will now show the selected Home page as your main homepage and use the Blog page to display your latest posts.
Update Site Title and Tagline
You can update your title and tagline later, according to your ease. By going to Settings » General. The site title represents your website’s name (e.g., “WordPress Expert”), while the tagline is a brief description.
If preferred, you can leave the tagline blank, as SEO plugins like Yoast SEO can override it for better search optimization.
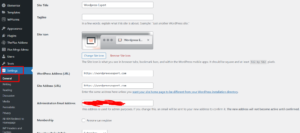
Remember to hit Save Changes to update your settings.
Configure Comment Settings
WordPress offers a built-in comment system. It allows visitors to engage with your content. However, it’s essential to manage comments to prevent spam.
Visit Settings » Discussion and scroll down to ‘Before a comment appears’. Check mark the option next to ‘Comment must be manually approved’. It enables moderation and keeps spam in check. Don’t forget to Save Changes.
Add Navigation Menus
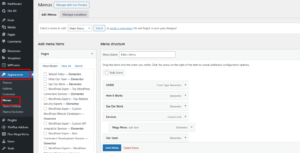
Navigation menus make it easy for visitors to explore your site’s pages and sections. WordPress includes a strong menu system, which your theme uses to display menus in designated areas. To set up and edit menus, go to Appearance » Menus in your dashboard and customize your navigation according to your theme’s options.
Now your website is well on its way to being fully customized!
1. Creating Navigation Menus in Classic Themes
If you’re using a classic WordPress theme, you can set up your navigation menu by going to Appearance » Menus in your dashboard.
Start by entering a name for your menu and clicking ‘Create Menu’ to set up a blank navigation menu. Next, choose and add the pages you want to include by clicking ‘Add to Menu’. These pages will appear in your new menu area.
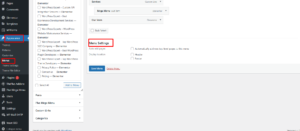
Drag and drop items rearranging their order to organize your menu.
Set Your Menu Location
Choose a display location based on the options provided by your theme. Typically, the primary menu location is in the header at the top of your site. Once everything is arranged, click ‘Save Menu’ to make your menu live.
Visit your website to view the menu in action!
2. Creating Navigation Menus in Block-Based Themes (Site Editor)
If your theme is block-based, navigate to Appearance » Editor to create or edit navigation menus.
Click the area where you’d like to add or adjust the menu to enter edit mode. Select ‘Choose Menu’ to open the available menu options, including any menus you’ve previously created, like your classic menu.
After selecting a menu, you can customize it further by adding blocks for pages, posts, logos, social icons, search bars, and more. Use the Add (+) button to add new elements.
Once you’re done, don’t forget to click Save to apply your changes.
Step 6: Installing Plugins in WordPress
WordPress plugins are like apps for your site, adding functionality and customization options. With plugins, you can easily include features like contact forms, photo galleries, and more.
To install plugins, go to your WordPress dashboard and click on the Plugins page.
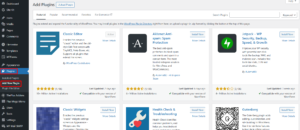
Currently, there are over 59,000 free plugins available on WordPress, in addition to paid plugins from third-party providers. With so many options, it can be challenging to know which plugins to choose—our guide on selecting the best WordPress plugins can help you decide.
Below are some essential plugins to install right away. All of these are free:
Essential Plugins for Key Features
- WPForms Lite – Adds a contact form to your site, essential for any professional website. WPForms Lite also supports payments.
- MonsterInsights – Connects your site to Google Analytics, allowing you to track visitor behaviour and improve engagement.
- Elementor– An easy to use page builder with drag and drop system for creating custom designs and layouts without coding.
Plugins for Website Optimization
- Yoast SEO – Boosts your site’s SEO to help you attract more traffic from search engines.
- WP Super Cache – Improves website speed with caching, enhancing user experience.
- PushEngage – Sends push notifications to re-engage visitors after they leave your site, a significant traffic source for many sites.
Plugins for Security
- Duplicator – Allows you to schedule automatic backups of your website.
- Sucuri – Provides security audits and malware scanning for your site.
Need Expert Help!
If you still need help. You can reach out to us. We can also create the whole website for you. Check our Custom WordPress Website Services. Let’s discuss now.

